My Round House

My Round House
Believe it or not, it's round!

Monday, April 30, 2012

Irrigation - Shifting Priorities

On many home renovation projects where improvements include both the interior and exterior areas, and when you're doing the most of the work yourself, priorities are always in a state of flux, constantly shifting up and down the list.  Seems like something is always happening that causes projects to be shuffled back and forth.   This project is no different.

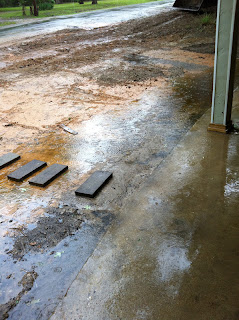
The recent rains and the ongoing flooding of the carport caused the need to remedy the drainage problem caused it to move up on the priority list.  Interior work was put on hold while the outside work took place.  It took about four non consecutive days for the work to be completed and while it resolved the drainage problem, the resculpting along the street left the ground scarred and a bit unsightly (as in ugly).
Need green....
Of course the remedy to that is to either lay seed or sod or both.  BUT....in order to do that, you need to do it before the summer heat sets in.  Therein lies the next shift in priorities;

Beating the summer heat.
Beating the summer heat is key to getting new grass and vegetation to grow and survive.  Key to that is WATER!

Water....
Now, you could use tap water like most folks but when you live on a lake you don't use expensive (and chlorinated) tap water, you use free and healthier (for grass and gardens) lake water.  To get the water from point A (the lake) to point D (the lawn), you have to go through several steps, not the least of which starts with the main irrigation line.

Irrigation lines....
Last year at the height of the drought, I took advantage of the dry channel out back and laid 200' of 2" PVC irrigation pipe.  200' might seem excessive to some but in all but the most extreme droughts, 200' assures an ample supply of water even when the lake is low.

To get the water from point A to point B through the pipes, you naturally have to have a pump.

Pump....
After a fair amount of research over the last year, I decided a 2hp irrigation pump would do the trick.  I wanted to be sure there was sufficient power, suction, and pressure to get the water to the furthest point some 160+ feet from the pump location.

Pump House....
The logical place to house the pump is right at the water's edge so that's where I laid the cement foundation on Sunday morning.
about 4.5' above the water


 As soon as it dries, the frame work will be removed.

Even so, this is just the beginning.  Once the pump is installed on it's pad, there is still the matter of routing power from the house to the pump followed by sprinkler lines to the logical places to install sprinkler heads.

More later.

Monday, April 23, 2012

Drywall - Interior Hallways

The interior hallway space is proving to be a bit of a challenge because both inside and outside angles are not simple 90 angles.  On top of that, not every corner is truly plumb which creates a problem of how to butt two drywall panels up to each other making a suitable transition from one panel to the next.  Inside corners are not so difficult as they will be taped over and made seamless.

It's the outside corners that are a PIA!
Not 90degrees...and not plumb floor to ceiling
Normally outside corners consist of a 90 metal strip that is tacked on and then mudded over.  But, since several corners are not 90 corners, normal corner moldings won't work.  That said, technically it's not my issue since I will contract out the mudding and taping of the walls.  Still, though, I need to be sure the drywall butts cleanly up to each other so later when the mudding is done, the infrastructure is there to support good work.

Another problem area.... 

Where two walls converge to form an end of a wall.  Not square and not plumb.  Not sure I'm THAT good at math!

Aside from that.....

More later!

Drywall - Entry Hall

With the outside driveway and drainage control issues resolved, it was time to move back inside and move on with drywalling.  I had been holding off on the hallway work so as not to damage it when moving things in and out via the hallways but I'm far enough along in the overall project that I felt it was OK to start working on it.

Entry Hall
If you'll recall, the original entry hall was a deep dark tunnel with a low  ceiling.  A pretty depressing place. 
To counter that, I removed the low ceiling in favor of the existing roof line thus making it vaulted and added a skylight to brighten the space up.  In addition, to provide even more natural light, I added a framed glass door. As the new drywall went up, the place did indeed start to lighten up.


The skylight really goes a long way in bringing light into the area.  Very nice!
I still have to do the angled drywall above what was a structural 2x4 board on each side that runs the length of the hallway where the old ceiling used to be.  I plan on covering over the 2x4 and using it as a surface to install some kind of up-lighting along the top so the entry hall and interior hallways are indirectly lit by invisible lighting reflecting back down to the interior space. 

More on that later.


Thursday, April 19, 2012

Drainage Control - Completed

Yesterday's delivery of the gravel for the driveway marked it's near completion.  I was on a conference call so I couldn't watch the delivery or most of the spreading it around but suffice it to say, it's done!  And I'm glad!

The carport is now higher than the ground!
The dirt was reformed to be a berm along the ditch
and a nearly 2ft berm behind the tree there in the center
You can see the crest over the pipe to keep water
off the driveway slope
Later, when the side access driveways are installed, the gravel will be scraped up and reapplied as base for the new driveways.  A side effect of this much needed drainage improvement is the newly relocated dirt in the form of berms along the ditches.  There's a lot of new bare ground surface that needs to be tilled and seeded.  It's always something. 

In the meantime, it's back to inside work.

Sunday, April 15, 2012

Weekend activities...and the rain


Saturday....
No work on the house as I took Saturday off to make a trip over to Waco to check on the property and to meet with a new Realtor who deals with farm related properties.  Need to get it sold!

Sunday...
The pre-rain weather with all it's warm sultry greyness was sufficient to zap my interest in doing much of anything today.  I did clean some of the underbrush along the channel but overall I simply didn't feel like doing much of anything.....so I didn't.

Sunday's rain....
The rain eventually made it's way across Texas arriving about 1pm allowing me to validate my investment in drainage control.  It wasn't a gully washer but it was sufficient to see that with few exceptions the regrading and berming along the newly carved ditches and in front of the carport had the desired effect.

The only pooling of water was immediately in front of the carport and was caused pretty much only by the run off from the roof.  The pending rock delivery should resolve that issue.

 The usual flooding from across the road was no longer an issue.
The water flows....
The culvert leading to the water channel


Driveway - Future plans

Future plans....

As mentioned in prior postings, the long range vision, assuming I'm able to pick up the lot(s) to the left of the house, is to convert the three bay carport to a four car drive through carport, a Porte-cochère if you will, with side access and a sweeping driveway on each side.

The newly installed culvert pipe will be dug up and split back into two sections, each one serving as the culvert pipe for each new driveway.  The existing ditch will be back filled converting it into a shallow runoff ditch much like the ditch on the right side referenced in earlier posts.  A medium rise berm will be installed directly in front of the carport covering the old driveway after the rock is scraped away and reused elsewhere.  It will be landscaped to provide a pleasant view from under the carport and introducing to some degree a means of privacy screening of the house across the street.
A landscaped berm will eventually
ease the view of the property across the street.

Friday, April 13, 2012

Drainage Control - Day 3-4

They guys were back going right back to work sculpting.
The new drainage ditch down to the underground culvert below the small cluster of trees.
 Measuring the drop in elevation with a tripod mounted laser.
Digging up 55' of old concrete culvert pipe in 3ft sections.  The entire pipeline has six inches of muck in the bottom essentially making them useless.
 Marking the placement of the new culvert pipe. 
The new pipe came in two 20ft sections, 40ft total so it was quite a bit shorter than the old pipe.   We we went back and forth on exactly where it needed to be placed for effectiveness but also for esthetics.  I finally settled on balancing it between the right two carport bays withing six feet of the mailboxes.

Burying the new pipe...

Buried and sculpted!

Next time.....
There is rain in the forecast for Sunday so the guys were determined to get it done by Friday but Murphy's Law reared it's head!  The load of rock to be delived and installed as the new driveway in front of the carport was delayed and could not be delivered so it's now scheduled for Tuesday morning.  Disappointing for sure but it means I'd get to see how the runoff is handled by the new sculpting when the rains come.

Wednesday, April 11, 2012

Drainage Control - Day 2

Left side...
The new swale redirects water away from the house and down towards the water channel
I'm standing down hill towards the channel
Never figured there was that much dirt in that area.
Dirt from the left side and swale
The pile on the right is from the front
The Front...
The front area represents a challenge because it's lower than the street level and it's the main means of access for parking.  Later when the side driveways are installed, it won't be an issue....but that's later this year so for now, it still has to accommodate vehicle traffic.

They first have to dig down in front of and taper away from the carport lip so that water from the roof can drain outward.  That has the propensity of making access to the carport a bit awkward due to the increased slope from the culvert. 
The water will run off that-a-way!
Somewhere under there...is the main water line.

We found the main water line! 
We knew approximately where it was so the tractor operator was very careful as he whittled down the surface dirt.  At some point, to prepare for the eventual side access driveways, the pipe will have be lowered some 12 inches below the new surface.  Next week or so before the ground gets too hard, I'll dig the necessary trench and drop it down.

Ditches...
As you can see, the plan is to run a ditch down to that little grove of trees which is actually a culvert drop where there is a big pipe that runs to the left under the neighbors property to the water channel.  When all is said and done, the majority of the water problem will be resolved with the water redirected down this ditch to the culvert and out to the lake.
The guys are back and working as I write this.

More later!

Tuesday, April 10, 2012

Drainage Control - Day 1

The work finally starts!
After a false start, work is finally underway to reshape the landscape around the house on both sides to deal with the overabundance of water flowing my way during a rain storm.  It's pretty obvious the previous owner(s) did nothing to maintain a healthy flow of water away from the house, rather apparently they just lived with the continual mess it created.

Creating a swale
They guys I hired started on the left side of the house scraping soil away creating a swale or valley to redirect the water away from the house and carport and down towards the water channel in back.  The dirt from that scraping was piled in the front along the street and will be repurposed to create a low rise berm behind the soon to be created shallow ditch along the road.  The berm will prevent water from cresting the ditch during heavy rains and flowing over the property in wild abandon as has been the norm in the past.
 They checked their progress periodically with a laser to insure a proper slope
The laser is used to check the slope
 The left side is almost done except for some fine tuning.
More pics and info on work performed in the front and right side in my next post.