My Round House

My Round House
Believe it or not, it's round!

Thursday, March 31, 2011

Ode to the Mud Dauber

mud dauber
–noun
any of several wasps of the family Sphecidae that build a nest of mud cells and provision it with spiders or insects.
Origin:
1855–60, Americanism

This house has thousands of them.  Mud duabers are harmless....unless, if unchecked, you count the tonnage of weight in dried mud they can add to a place over the years.  I'm surprised the ceiling didn't cave in.....  

The problem will be eliminated when the roof and walls are spray foam insulated with closed cell foam thus sealing out the outside world.  In the meantime, a few pics...


A high rise...

 I found a small hole in the yard and decided it might be fun to fill it in with old nests just to see how tall I could get the pile....
First load

Second load

etc....
 I'll keep updating this page as the mound grows (assuming it doesn't rain and they dissolve away).

4/9/11
The mound continues to grow.....
 Only a small section over the master bath to demo so not going to add any more pics though I'm sure there's another 200-300 nests up there.  Jeesh!


Demolition Continues...

I'm making great headway. 

First, did I mention the hundreds....no....THOUSANDS of mud dauber nests in the attic and wall cavities??  Industrious little guys if left alone!  So much so that I must pay tribute to them and give them their own page!

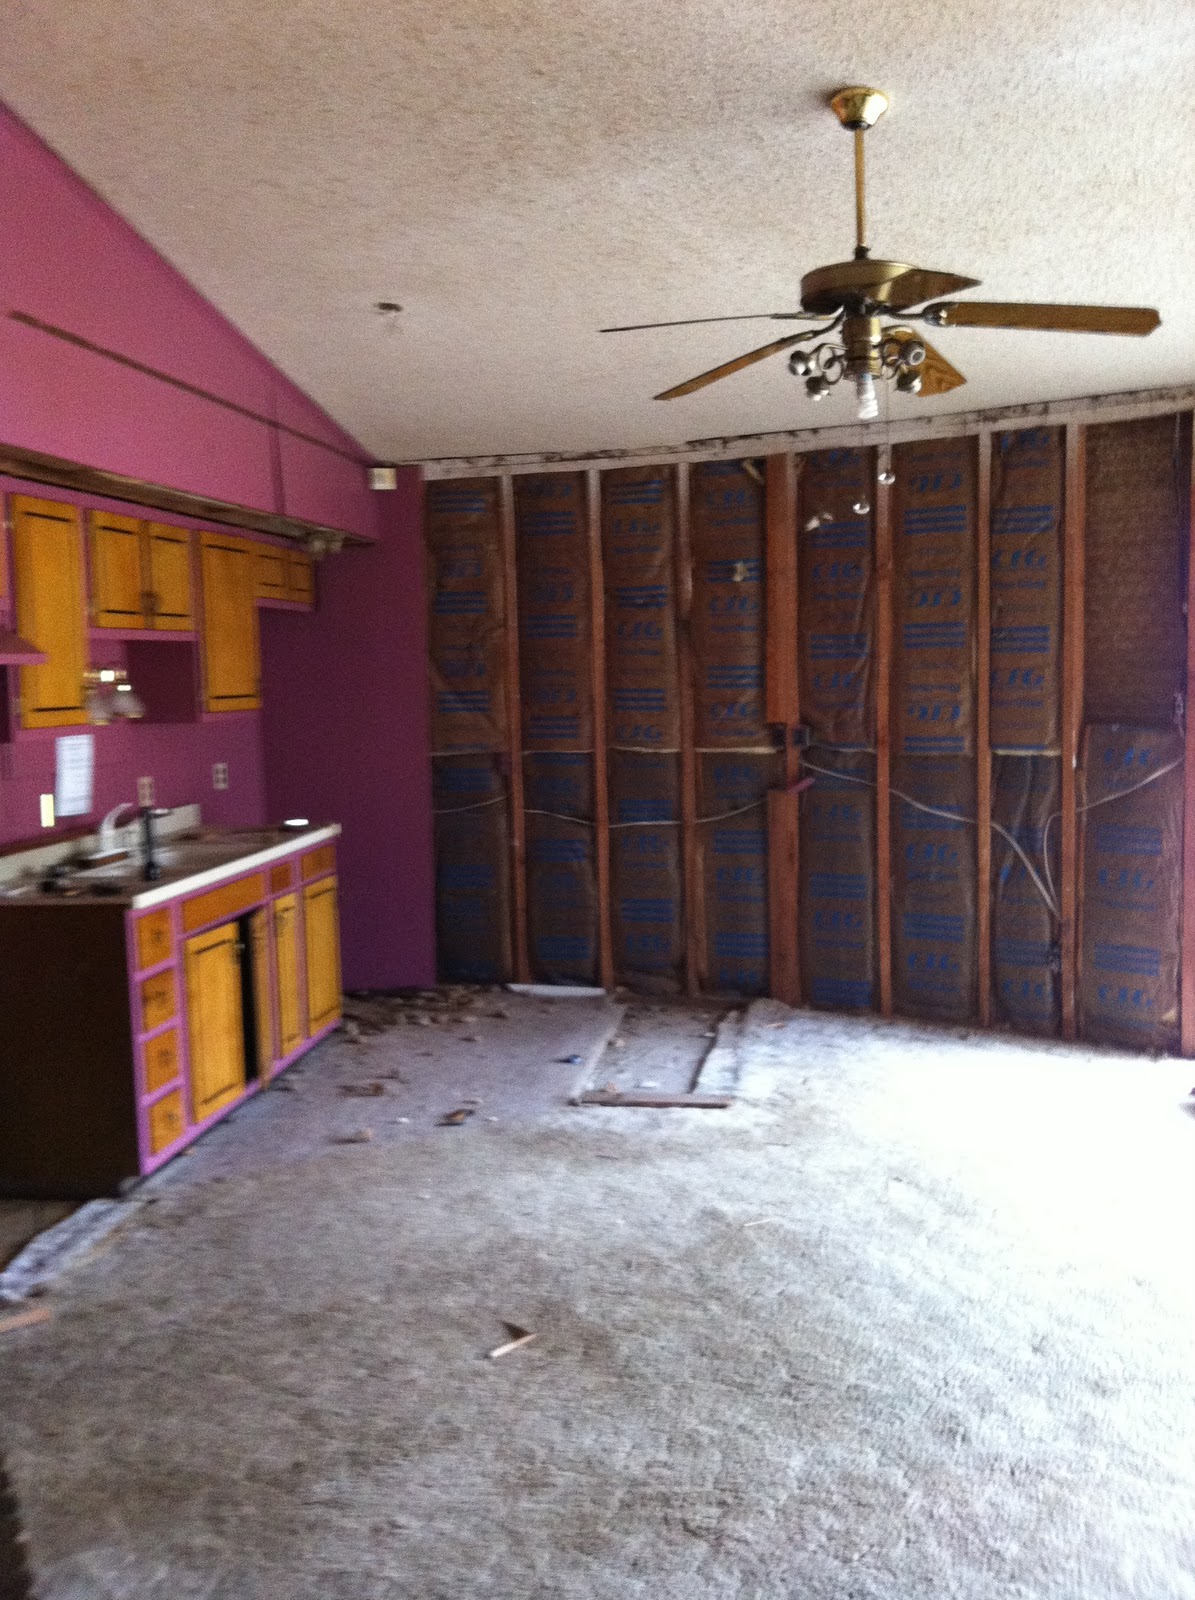
Anyway, all of the rooms except one part of the master bath have been stripped of their paneling and doors.  It's all ended piled in the garage and that semi-sorta space that used to be the carport.
With the exception of the bathroom and hall ceilings covered below, that leaves only the ceilings in the three bedrooms and the partial ceiling in Great Room to come down which is planned for next week.  I'm leaving all the carpeting in until last.

I did have a little bit of excitement when pulling down a panel in the master bath where the sink used to be.  I had capped all the water lines so I could better remove the paneling but I wasn't paying attention and one of the caps got stuck in the panel hole.  I yanked on the panel and the water line where it had been coupled in 1969 came undone shooting a nice 1/2 wide stream of water across the room.  OOPS!  Well, at least it wasn't the cap I put on earlier that gave way.  That would really have been annoying!  And I'm sure glad I had a new water shut off valve and my shop vac handy!!
I haven't yet removed the insulation throughout yet figuring it's best to leave it in place for now and pull it all down at one time when I'm ready to haul it immediately off to the landfill.

I pulled the sheetrock down from the ceilings in the bedroom closets, entry halls, and the two bathrooms.  Thank god I had my mask and goggles on because there was just no pretty or sanitary way of doing it.  You have to be standing underneath it to get it to come down.  It was every bit as NASTY as I thought it would likely be.  I got rained on by rat shit, cat shit, bird shit, mud dauber nests and the residue and dust from 42 years of who knows what other kind of shit left up there.
That's pristine compared to what came down when I pulled the ceilings down in the bathrooms.  Trust me, those stains are necessarily water stains..... and not to gross you out even more, but this fossilized sample (one of several found throughout) fell from the partial ceiling removal in the Great Room leaving me to wonder what kind of animal could do that in a confined 5.5" tall space stuffed (or was) with insulation....
Given the roof rafters design the only way in or out was from the external eves.  That's some industrious cat size animal whatever it was nesting and dumping in the insulation batts (rendering them useless I might add).

For those of you old enough to remember, I found several 1970's vintage carpet store 'samples' of shag carpeting in a host of colors from that time period.  If I had a pair of bell bottom jeans (shudder) I could mount them side by side as a public warning reminder of what NEVER to do again!

Opportunities abound!
It's exciting to see the bones of the house exposed.  They're stout and in excellent condition!  As anticipated, opening up the walls opens up all kinds of opportunities to make various improvements on the design and visual appeal of the place.  I'll expand on those ideas later as I start 'improving' on things.

One area deserving special mention now is the architectural significance of the entry hall, the two hallways around the fireplace, and the two bathrooms.  For some unfathomable reason, the ceilings in all of those areas were by design only 75" high. There's a lot of dead but attractive space up there above those ceilings but yet, here it is! 

The entry hall feels claustrophobic and dark when first entering the home.

 The bathroom ceilings also lent to the enclosed feeling.
(Taken while owners still lived there.)

So what's the answer.....?

Let's vault everything.....
As anticipated, the low ceilings were really just cosmetic and not structural which means for the most part they can be removed in favor using the underside of the roof thus making them taller and vaulted matching ceilings in the bedrooms and the Great Room.  That's going to considerably improve the open feel of each of those rooms.  Since I can now go up to roof, I can install several skylights allowing natural light into those previously dark cave-like areas.  That will go a long way to reducing energy consumption too.

Since I want to relocated the AC and water heater systems to the area above the center hall to free up additional closet space, that particular ceiling height will remain unchanged.  The entry hall leading to the center hall can be vaulted as can likely the two hallways on either side of the fireplace but I'm not sure yet if I will vault those two.  That may be going to far for no particularly good reason.  I'll leave the ceilings in the bedroom closets at the same height as that will facilitate new/improved mechanical systems needs.

The laundry dilemma...
At one point, the center hall used to house the laundry room.  Several of my friends commented on the prospect of walking in the front door only to see the washer and dryer staring back at you.  I had to agree.  It was definitely a problem that needed a resolution.

The previous residents solved their problem by attaching garden hoses (seen on the garage floor pic above) to the cold and hot water spigots in the hallway and running them above the entry hall ceiling out to the garage (I'm sure there's a term for that).  My neighbor across the street suggested I could build something on the side of the house....all I could envision was an Outhouse.  No thanks.

As the walls came down I noted in the main bath, there perhaps appeared to be enough space to support a stackable where the sink was originally placed.
A small pedestal sink could be placed to the right of that without feeling like you're crowding the toilet.  It would solve a pretty major issue.  The washer would have to be a front loader to minimize the amount of water sent to the septic system (which is pending investigation and fodder for a future posting).  I'm going to look into that more!

In the meantime, to better impress my friends upon entering my home, I figured I'd put the hallway to a better use......


Plenty of space to...spread (but no toe tapping!).  An excellent idea, don't you think?

All in all, a very good two weeks indeed!!


Demo Day 3 revisited

I mentioned the water company required I install a shutoff valve between the meter and the house before they would turn the water on so I had to dig a hole.
I installed the valve.  A lovely piece of work if I do say so myself.  Anyway, I went back two days later to back fill around the valve housing I put in the hole only to find the hole filled with water!  Crap!
 Naturally I assumed the leak was due to my workmanship.  I was perturbed until I looked in the meter box and found it full of water too.   
Elevation wise, the meter box is slightly higher than my shutoff valve which means the meter line was leaking.  Now I will admit at this point to being relieved, even slightly pleased that it wasn't my valve that was leaking....

When the water guy originally came out and turned on the water he didn't stick around to see if there was a problem and I didn't look in the hole for two days.  The leak was minor but sufficient to eventually follow the pipe downward and fill the valve hole I dug.  I called and the water guy came back to look.  He apologized for not looking closer when he turned the water on.  He drained the meter box and found the leak to be on the house side of the meter....you know what that infers.....

The water guy tried to fix it by tightening the nut on my side of the meter but couldn't budge it and even got his wrench stuck on the nut.  Somewhere in there, like a good corporate employee, he subtly inferred I might have caused the leak when I installed my valve....... He said he'd open a work order to have someone come out and fix it as it likely would require the water for the whole street be turned off.   JEESH!!

The way I look at it, it's in the water company's meter box and they told me several times I'm not allowed to touch their meter.  I didn't and haven't sooooo.....to me (naturally), it's they're problem.  That's my story and I'm sticking with it.  In any case, there's no proving one way or the other what caused the leak so we'll see who gets stuck with that bill!


Friday, March 25, 2011

Demo day 3-4

I've made decent progress thus far. I completed the install on the water shutoff valve. It was a bit frustrating putting the pieces together and getting everything ready for "sweating". The old adage applies here; " measure 30 times, cut and sweat once". Did you know that copper is up to $3.25 a pound know? All the parts necessary to create the valve ran about $52.00. Some of it will be used on future plumbing tasks. The water company was satisfied and I now have water.

I pulled down the walls in the third bedroom and finished pulling paneling from some areas that I planned to come back to. I also pulled down the faux beam in the great room which then lead to prematurely pulling some of the sheetrock from the ceiling (cuz I couldn't resist). I'm pretty pleased, while there was some slight damage due to carpenter ants over one of the windows, it was pretty minimal. I can probably clean it up, treat it, and close it up.

I still haven't figured out how to load pics from my iPhone so will post them shortly.

Tuesday, March 22, 2011

Demo day 2

In conjunction with the purchase of the house, I also transferred to the local store and worked all weekend and due to some unresolved logistical issues related to settling in I wasn't able to do any work after work.  Except for my iPhone 4, I don't have normal internet access at the moment so my postings are going to be somewhat sporadic for a bit until I get settled in and can figure out how to improve that.  I doubt I can do my postings from my iPhone but hey, nothing ventured, nothing gained!  Anyway, by Monday I was finally able to get a good 3/4 day of demo in in-spite of several interruptions. 

First interruption, I had to drive over to the water department to open a new account.  A couple of hours later the water guy came by to turn the water on but wouldn't because they require a customer shutoff valve between the meter and the house before they can turn service on.  There wasn't one so that means I have to install one.......So, I dug a hole.
I have to cut out that section of pipe to install the shut off valve.  I didn't have my pipe cutting and repair tools with me this trip so I will complete this task on Wednesday.

Second interruption(s), a couple of inbound phone calls lasting over an hour.

My third interruption, the retired neighbor from across the street came over to chat and to see if I might have any kitchen cabinets I was disposing of during the demo.  He and his wife bought the distressed condition house across the street and were rehabbing it on a shoestring budget.  The previous 'owner' apparently stripped out the house when they defaulted on the note and left with everything they could take with them.  After hearing his life story I offered them to him free of charge.  He left and came back with his wife and I heard more of their life story.  In the end they were very grateful for the cabinets and I was glad I could help them out and that the cabinets were going to be put to good use (I hate to throw good stuff like that away).

Lousy pic!

So far the demo has been easy because the walls are cheap paneling which pretty much peels off with a swift kick and a tug.  No mess.  I just drag the panels out to the garage for later disposal.  I'm not looking forward to dropping the ceilings as they're sheetrock which is always messy....and in this case, full of mud dauber nests, rat droppings and who knows what else!  I can hardly wait.....(I've got my mask ready!) 
Speaking of mud dauber nests....this was just a small sampling of what was found attached to the tops of the the kitchen cabinets and behind some of the crown moldings....a harbinger of things to come.  
 I'm a bit worried my future plan to stain and seal the concrete floors will go south.  The exposed floor under the old island has trowel marks in them suggesting there may be similar deficiencies elsewhere that would preclude effective staining.  I may have to move to some other type of floor covering.

Wednesday, March 16, 2011

Demolition Day 1

With any new house, one has to get the utilities turned on but in so doing, I found I had to make a trip out to the house to validate a couple of things, mainly the location of the water shut off valve (I couldn't find it) and the electric "Smart" meter ID number.  I also met up with the HOA president and spent about an hour chatting with him. 

I hadn't planned on doing any demolition work but since I was there....naturally I just couldn't help myself!!

I started by poking around in the 'attic' to see what was going on up there.  Unfortunately it didn't occur to me at that moment to whip out my iPhone and take some pics so you'll have to rely on my power of descriptions (I'll get some pics later).  Anyway, this was my first look.  It was a mess!  Insulation that had been stuffed between the roofing joists had fallen leaving much of the roof uninsulated.  I found all of the internal walls were open to the attic space so there was unconditioned air between the walls both in summer and winter.  This place must have been a killer to heat or cool.  I could also see hundreds if not more mud dauber nests.  So much for having a secure attic space.

BUT....on the upside, I was able to see that much of the lower ceilings in both the entry hall and bathrooms could be vaulted up to the under roof deck giving the appearance of more airspace.  It also permits easier installation of solar tubes or skylights allowing light into areas that currently have no natural light.

A really big plus is that the support beam in the great room that was showing signs of collapse up towards the top of the fireplace was really just a faux beam, a hollow box that had no structural value at all!  That was a big relief as it indicates the roof itself is structurally sound.

The outside walls were all insulated with fiberglass batts leading me to have second thoughts about spray foam insulation in the walls but I finally got over that struggle and will spend the money and do the walls and the roof underdeck correctly with closed cell expanding foam as originally planned.

Pictures

Kitchen area

Kitchen before
Kitchen After (well, sorta)
Entry Hall/Laundry area before
Entry Hall/Laundry area after
The support beam in the great room was thought to be collapsing but it proved (to my great relief) to be a faux beam with no support characteristics at all!
It looks pretty bad, a support beam collapsing....
But it proved to be a faux beam not supporting anything (phew!!)

Monday, March 14, 2011

Gained access to the house as the new owner

Was able to gain entrance today as the new owner.  Couldn't stay very long today but it was good to walk around.  I swear it gets smaller every time I'm there.  What I mean is that while I have a correctly scaled floor plan drawn up, it sure makes it seem bigger in my mind.  But smaller is the whole point I suppose.    I did my first two pieces of demo.  The kitchen island countertop came off when I pushed on it and I pulled a small section of paneling off.

It's going to be another week before I can really start in earnest.

Friday, March 11, 2011

Sign, Sealed, and Delivered!!

It took all of 15mins to sign the paperwork and become the new owner.  It's a done deal!!

YOWZA!!  Let the fun times begin!!

Wednesday, March 09, 2011

Tomorrow's the day!

March 10, 2011.  One more day till closing and I will sure be glad when it's all over with.  An early birthday present to me! ;-)

In months past I'd been browsing around for ideas and such but there's only so much planning you can do in advance.  You just gotta get your hands on it.  It's been a bit frustrating waiting for HUD to move forward but were finally there.  Still, all my planning is on hold until the deal is done!

Yet another idea.....

Since this is a slab foundation and given the unique nature of the floorplan: ROUND, I decided to do something unusual with the interior floors.  When all the demolition work is done and the old carpeting removed, the insulation work and feature enhancements have been completed and the walls closed up again, I'm going to clean and stain the concrete floors.  It's less expensive than going wall to wall carpet and certainly more greener!

Here's a pic of exactly the look I'm going for.
The center point of the design depicted above will originate from the center of the house which is inside fireplace firebox (below).  Straight lines would radiate out to the outside walls at either 4' or 8' intervals (tbd) on the outside wall.  The curved radius lines would originate from the two outside walls on either side of fireplace promoting a subtle hint of a natural path across the front of the fireplace around to each hallway entry essentially completing a circle around the fireplace.
(prior to previous residents moving out.)
It keeps with the round nature of the overall home design.  The colors will be very similar and as rich!  There's an area carpet at the local Lowes Home Improvement center that has exactly the colors I'd like to replicate as well.  Will try to get a pic of that next time I'm there!

Thursday, March 03, 2011

Finally a closing date!

Thursday, 03/10/11 @ 12:00pm.

It's about time!
I'll sure be glad when the ink has dried on the dotted line!